It should be a simple task to change your default apps. Unfortunately, it isn’t. Here’s how to do it, using the example of changing the default browser from Edge to Chrome:
- Go to Settings > Apps > Default apps, then scroll to the app you want to make your default app for a specific file or action. In our case, it’s Google Chrome.
- Click the arrow next to the app, and at the top of the screen that that appears, click Set default.
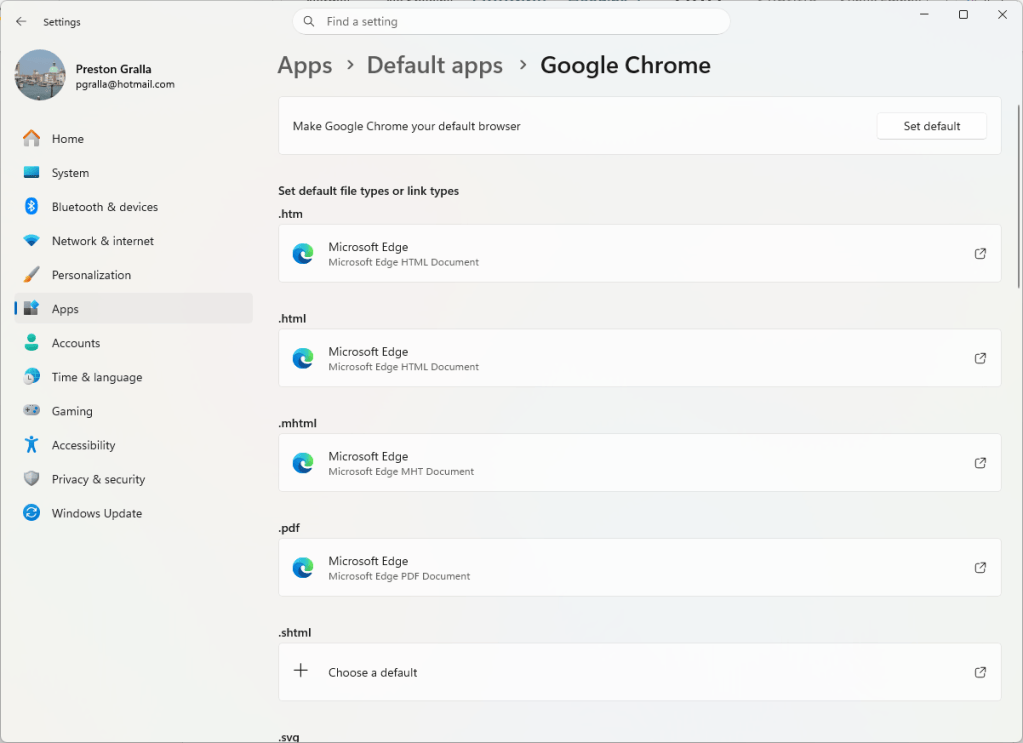
Setting a new app default — in this case, Google Chrome for web browsing.
Preston Gralla / Foundry
- A checkmark appears next to “Set default.”
- To change the default back to Edge or another browser, scroll to the browser you want to be the default and click Set default.
Follow these same steps to change any other default app.
That may only be part of the process, though, because certain file types may still be associated with Microsoft’s default app. Even after changing the default browser to Chrome, for example, PDF files, mailto links, some graphics files such as .svg, and other file types are still associated with Edge by default. You’re going to have to hunt them down and change them one by one.
This may be true not just when you change your default browser, but for when you change any default app. You’ll have to hunt down the other associated file types as well.
Here’s how to do it with our example of Google Chrome. Follow the same directions for other apps:
- Go to Settings > Apps > Default apps and click your new default browser — in our example, Google Chrome.
- Scroll through all the file types and protocols, and click any still associated with the previous default (in our example, Edge).
- On the pop-up screen that appears, select the app you want to handle the file type (in our example, Google Chrome), then click Set Default.
Keep in mind that you don’t have to use the new default app for every file type. You can, for example, choose another app, such as a PDF reader for .pdf files.
5. OneDrive can drive you batty
In theory, Windows’ built-in cloud storage app OneDrive is a great idea. It integrates with File Explorer to store your files on your PC, automatically backs them up to the cloud as you change them, and syncs everything with the cloud and all your devices. And you get 5GB of cloud storage for free — more if you use certain versions of Microsoft 365.
What’s not to like?
Plenty. There are so many confusing things about how it works that delving into them all is beyond the scope of this article. (In fact, we have two separate tutorials dedicated to using OneDrive in Windows and using OneDrive on the web.)
So I’ll only cover the weirdest and most baffling thing here: The strange tale of dueling Recycle Bins — one in OneDrive, and one in Windows — which contain different files depending on how the files have been deleted.
Until the advent of OneDrive, when you deleted a file in Windows, it was sent only to the Windows Recycle Bin. The deleted file stays in the Recycle Bin for some time, so that if you accidentally deleted it, you can easily go there and restore it. How long the file remains there varies according to the size of your hard disk, how much space is devoted to the Recycle Bin, and your settings.
Then OneDrive came along with its own Recycle Bin, separate from the Windows Recycle Bin. So now, depending on how you delete a file, it will go into either the Windows Recycle Bin or the OneDrive Recycle Bin, or both. If you don’t know where to look for a deleted file, you won’t find it. Most people don’t even know there’s a separate OneDrive Recycle Bin, because Microsoft has done such a good job of hiding it.
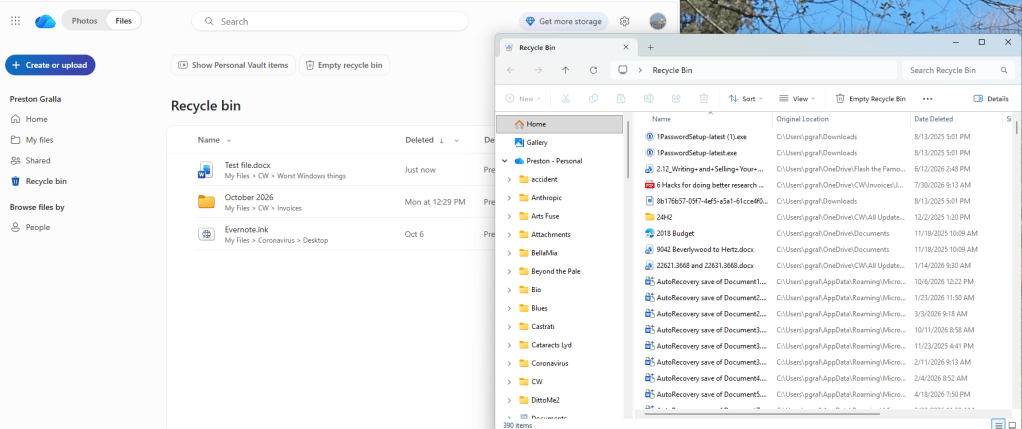
The dueling Recycle Bins in Windows and OneDrive
. (Click image to enlarge it.)
Preston Gralla / Foundry
The first thing you need to know is that the OneDrive Recycle Bin only appears on the web-based version of OneDrive. It’s nowhere to be found in Windows itself. You can get to it in two ways:
- Right-click the OneDrive icon on the right side of the Windows Taskbar and select Settings > Recycle Bin. You’ll be sent to the OneDrive Recycle Bin, which is located in the web-based version OneDrive, not the local Windows OneDrive.
- Go directly to OneDrive on the web and click Recycle bin in the left-hand pane.
As to which files end up in the OneDrive Recycle Bin, it’s fairly mysterious. Given that OneDrive is so well-integrated with File Explorer, you would expect that files deleted in File Explorer would end up in there. Some files do, and some files don’t. If you delete a file in File Explorer that is synced to OneDrive, that file will show up in the OneDrive Recycle Bin as well as in the Windows Recycle Bin. If the file hasn’t been synced in OneDrive, it will appear in the Windows Recycle Bin only.
That means that if you delete files from the Downloads folder, they likely won’t show up in the OneDrive Recycle Bin, because by default, Downloads aren’t synced to OneDrive. If you do sync your Downloads folder, files deleted from there will show up.
I mentioned earlier that some deleted files go only to the OneDrive Recycle Bin. That typically happens when you delete the file in the web version of OneDrive. But it also happens when you delete the file from within a Microsoft 365 app like Word, such as by going to File > Open, then right-clicking a file you see there and selecting Delete file from the menu that appears. When you delete a file in either of these ways, it shows up only in the OneDrive Recycle Bin, not the Windows Recycle Bin.
The good news is that once you know all this, you should never lose a deleted file again. Whenever possible, delete files only using File Explorer. Every file deleted that way ends up in the Windows Recycle Bin, even if it doesn’t also show up in the OneDrive Recycle Bin.
You can also check both Recycle Bins if you can’t find the deleted file. It’ll show up on one or the other. Restore it from whichever bin you find it in.
For much more information about the ins and outs of OneDrive, including some nifty features available only in the web version, see Microsoft OneDrive cheat sheet: Using OneDrive in Windows and Microsoft OneDrive cheat sheet: Using OneDrive for Web.
More Windows tips: